Thursday, December 20, 2012

Box Card Gift Holders!

Hello!  Last weekend I was feeling overwhelmed because I had made my cards, but that was all!  Well, I have to say I am much better now!  This week I accomplished a lot including decorating the house, getting our tree and decorating it, wrapping the few gifts I have, and making the gift card holders that we put money in to give to the grandchildren.  In my last class at The Crafty Scrapper, we made 5 tags and this box card gift holder.  I knew as I was prepping for the class, that I would be making four more of these for the grandchildren.  As it turned out, I had four kits left from my class, so I went with the red base for all of them, since the cardstock was already pre-scored and ready to be made into the boxes.  Let me show you how they came out and then I will be giving you a little tutorial on how to make these.  They are impressive when they are put together, but so easy to make!  Enjoy!


Close Up #1

Inside panel with pocket

Close up #2

Close Up #3

Close-up #4
I gave you close-ups of each so you could see my circle stamped panels on each.  By the way, all for stamps came from one set of cling stamps I got at Michaels last year.  (Recollections set).  The finished card is 5 inch wide by 5 1/2 tall, so it fits into a larger square envelope.  Now, onto the directions:

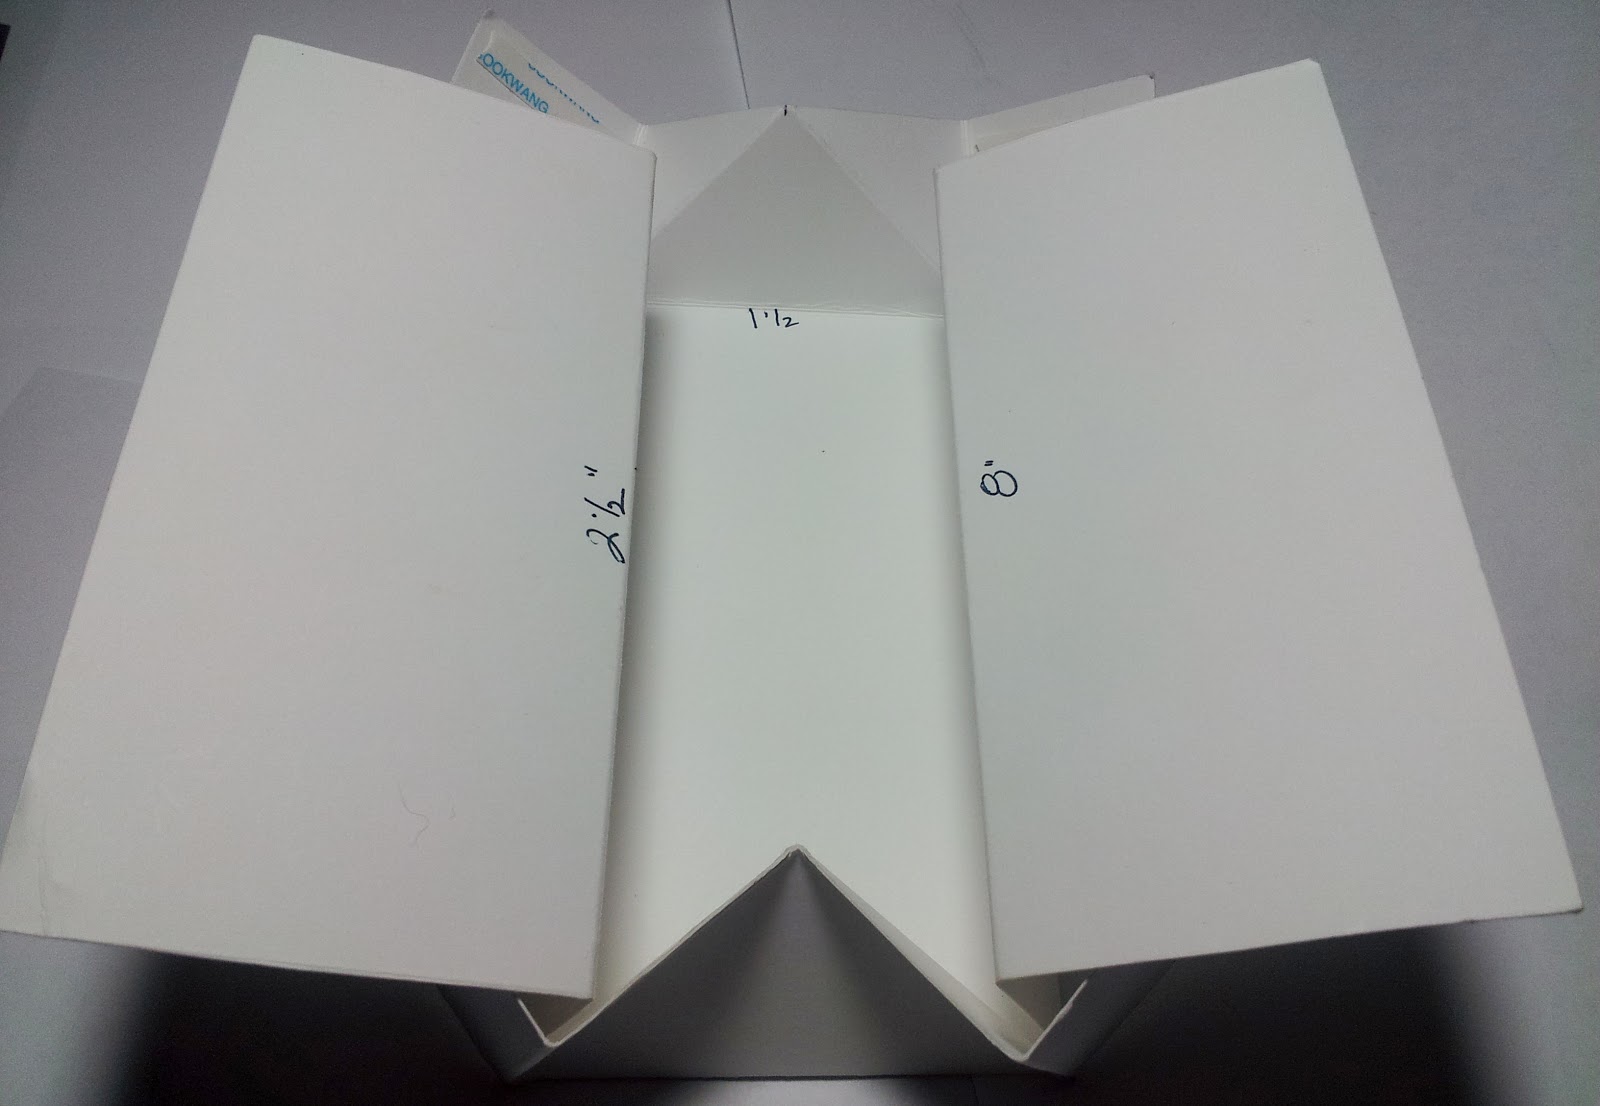
You start with a 8 ½ x 11 inch piece of cardstock.  In the horizontal direction, score at 2 ½”, 4”, 7”, 8 ½”. In the vertical direction, score at 1 ½” on either end.  Make a mark in the middle of the cardstock at 5 ½”. Next, you will need to create the diagonals by either using a score board or bone folder and a ruler. You will need to score from the mark you made to the 4” and one to the 7” only down to the 1 ½” line. Do this on both sides. Now, make a cut on your score line up to the 4” score line. Do this on all 4 sides. And then cut off the first rectangle (they measure 1 ½ x 2). Again, all 4 sides. Now, the most important part is to make sure those diagonals are mountain folds, and the other score lines are valley folds, well except for the two front flaps that will form your card, they are mountain folds too. You want your lines to be scored very well to create your box.  You can see in the visual pic below, the scored lines, the folding, and the cut off pieces.


As you fold, the diagonals will create the box and the two flaps (on either side) will get adhered (I have score tape on these flaps in the above pic) under the front flaps The next pic shows how it looks as it is being folded up.

Now, one last thing ... to form the inside pocket:  Cut a piece that is 3 3/4" wide by 2 1/2" tall.  Score on three sides 1/2".  Fold the three sides in and add your adhesive to the flaps ONLY.  This will allow room for you to add money, a gift card or a note.

It is times like this, that I wish I had a setup to make a you tube video, so that you could have a full visual!  Maybe that is something I should look into?  But for now, if you have any questions, or need any help at all making these box cards, just send me an email.  I will be glad to help!

My granddaughter who is 13 asked me to make a card for her to send to a friend.  I did it and so tomorrow I will show you that one and then Saturday, I will have the weekly sketch share.  See you then!

Happy Stamping!
Tina


Saturday, December 15, 2012

Happy Howl-idays!

Welcome to the second post of the day.  If you missed the first one, be sure to scroll down to see it!  Thanks for joining me today for my big 'ole HAPPY DANCE!!  This post shows the last of the Christmas cards I am making this year!  Woo Hoo!  I can't express how happy I am in finishing the making of these cards.  I even make a few over my list so I could take about 8 to the gift shop where I try to sell my cards.  I also took about 10 of the tags from last year and this year's tag class.  So, it's late, but at least it is done.  And if they don't sell, no big deal.  Now, I have to spend time getting the cards signed and ready to be sent out, which is a chore, but that is just part of it, 'cause, if you make 'em, you gotta send 'em!!  O.k., for the last creation, I have a really cute one to share with you.  Let's get to it.  I also made more of a couple of class cards and I have reminder pics of them for you too!  Enjoy!


Reminder of class card

Class card revamped in more simple style.
Reminder of class card
First of all, do you not love the doggie card?  How about how the ribbon and the dog tag match the dog's collar and tag?  I love how this one came out.  I made 6 of this card.  And then, of the two class cards, I made 6 of each of those.  I love the class card with the angel and Jesus but I was so ready to finish that I decided it would be to my advantage to go with a more simple card layout.  And I love how this one came out too!  So, here is the final total ... I made 87 New cards in the last 3 weeks!  WOW!  I really enjoyed it and I loved having fun cards to show you here! 

Recipe for Happy Howl-idays card:
Paper - October Afternoon Holiday Style line "Figgy Pudding" (from stash), Cardstock Natural White, Red
Stamps - Inky Antics Punny Christmas Pups, Tiny paw on tag from Inky Antics Delightful Dots #1
Ink - Memento Black, Copics, Versafine Vintage Sepia (for paw on tag)
Tools - Spellbinders Classic Oval, Classic Scallop Oval, Ribbon Tag, Classic Circle, Martha Stewart snowflake punch
Other - Ribbon by American Crafts, Big Rhinestones by Bazille, Twine by The Twinery


I am planning to make a few more box card gift holders like the one I taught in class last week, so when I get those ready in a few days I will show you those and also give you a tutorial on the cool box.  So, seen see you sometime next week.

Happy Stamping!
Tina

Saturday's Sketch Share!

Hello!  I have two posts for you today.  I planned on doing one yesterday, but life got in the way.  So, make sure you check out both posts.  I am doing a big 'ole happy dance!  Yes, the next post shows the LAST of the Christmas cards!  But, first, let's do this post, the weekly share between Debbie and I!  I will show you my card (of which I made 5 additional to add to my stash), Debbie's card and the sketch we both used!  Enjoy!
 
My Card

Debbie's Card

The Sketch
This one was kinda fun, I thought.  It gave me a chance to make another one of the 3D ornaments.  It does like flat when you mail it, but I guess it would be smart to add a note, so the recipient knows to form it back into a 3D element.  This layout is almost too simple, but it definitely is open to all kinds of possibilities.

Recipe for my card:
Paper - Bo Bunny Rejoice 6 x 6 pad, Cardstock Red, White, Green
Stamps - Sentiment from Penny Black, Christmas tree from Stampin' Up (2002 set)
Ink- Memento Black, Copics, Versafine Black (sentiment)
Tools - My Favorite Things Ornament Die-namics
Other - Rhinestones, Red Hemp Cord

Don't forget to check out one more post from me today! 
Happy Stamping!
Tina


Thursday, December 13, 2012

Sweet Holiday Wishes!

Hello!  I have another Christmas card for you today.  I am getting very close to the amount I need which includes the church add-ons and the ones I can take to the gift shop to put in my booth to sell.  Now grant you, they will only have a week to sell, but it is, what it is!  I found a package of these little tiny cookie cutter charms that I obviously got last year and knew the perfect stamp to match up with them.  But, I don't own the stamp I had in mind, but I was pretty sure I had stamped some off from a friend earlier in the year.  After a little search, I found them!  Now, the search was on for the perfect paper ... I found it in my stash, but only a piece big enough for 4 cards, which is fine since that is the number of stamped off girls I found.  Putting all this together, created this fun card ...enjoy!


Don't you love how it all came together?  I love this stamp ... going on the wish list!  And, how about that tiny gingerbread man charm?  Soooo cute!

Recipe:

Paper - Reminisce called Yum, Yum (from 2010), Cardstock White, Pink, Red
Stamps - My Favorite Things a la mode What's Cooking, Sentiments from a la mode set Candy Cane Kisses
Ink - Memento Black, Copics
Tools - Cuttlebug Polka Dots embossing folder, Lifestyle Crafts Jubilant (1 of 2 from set) embossing folder, Spellbinders Lacey Circle, My Favorite Things File Tab Die-namics
Other - Twine by The Twinery, Mini Cookie Cutter by Dress It Up, Rhinestones

I will be back for another tomorrow.  See you then!
Happy Stamping!

Tina


Christmas Card Count:

From Classes - 9
Tree card (11/27 post) - 3
Candy Cane girl (11/28 post) -4
Skating bird (11/30 post) - 4
Reindeer (12/1 post) - 4
Bulb girl (12/2 post) - 12
Santa's Helper (12/3) - 6
Wisemen (12/8 post) - 4

Glory To God (12/11 post) - 17
From Our House to Yours (12/12 post) - 6
Sweet Wishes (today's post) - 4
Total so far - 73


Wednesday, December 12, 2012

From Our House to Yours!

Hello!  I am back today with another fun Christmas card!  A while back I had to order online some cardstock to match a color I was using in one of my classes, and so at the same time, I added to my cart a die I had seen around the pinterest boards.  I had not had a chance to use it yet, and really I wasn't thinking I was going to use it for Christmas, but again, I saw it on pinterest, this time for a Christmas idea, and I knew I had to use it!  Here is my card ... enjoy!


Go here to see the pinterest card, which became my inspiration for my card.   Unfortunately, there is not a proper link, so I am not sure who to give credit to.  Their card, of course, was too simple for my taste, but it gave me the great idea to not only color the houses and the trees, but to add "chunky" snow to them!  Here is a close-up ...


Cool, huh?  With a quicky glue pen, I did a layer of clear glitter, but then in my stash, I found this chunky glitter and so I added that too!  Do you see the house button?  It was on a set of buttons, mostly regular buttons, that matched this line of papers.  I couldn't resist getting it,as I knew it would just make the card!  Of course, only one of this house is in the set, but there was one more house button, and then there were 4 other snowflake type buttons.  Perfect, as I made 6 cards like this one!
What do you think?

Recipe:

Paper - My Minds Eye Winter Wonderland 6 x 6, Cardstock White, Light Blue, Red
Stamps - Sentiment from Verve
Ink - Versafine Black, Copics
Tools - My Favorite Things Dainty Dots border Die-namics, Spellbinders Lacey Circles, Classic Circles
Other - Decorative Button from My Minds Eye, Quicky Glue Pen, Clear Glitter, Chunky Glitter (Westrim?), Rhinestones, Twine from Maya Road (this twine is thicker than the Twinery twine, but the store was out of the Twinery twine, so I got some of this), Ribbon by American Crafts

I am getting close to the finish line ... but not yet!  I will see you tomorrow for another creation!
Happy Stamping!
Tina

Christmas Card Count:

From Classes - 9
Tree card (11/27 post) - 3
Candy Cane girl (11/28 post) -4
Skating bird (11/30 post) - 4
Reindeer (12/1 post) - 4
Bulb girl (12/2 post) - 12
Santa's Helper (12/3) - 6
Wisemen (12/8 post) - 4

Glory To God (12/11 post) - 17
From Our House to Yours (today's post) - 6

Total so far - 69

Tuesday, December 11, 2012

Glory to God in the Highest!

Hello!  I am back to working on my Christmas card stash.  I am hoping that I am close to finishing however, I did not help matters by deciding to add in a bunch of the church people (about 20!).  I know I may regret it because it seems I am not doing "flat" cards, which bulky means additional stamp $.  Today's card is a religious one and it is not flat!  But, it is very pretty and was simple!  Let me show you ... enjoy!


I have to tell you that the ribbon is not as red as it seems in the pic.  It is more of a deep dark burgundy.  But, it is so pretty.  Originally my card had a green strip where the ribbon is, and I was thinking a skinny ribbon over the top of that green.  Well, a lot of the ribbons at Crafty Scrapper are wider, so I changed the card a little so I could make this beautiful burgundy ribbon work.  The gold balls around the tie were also bought in the ribbon area and is a gold wire with balls every so often.  I thought it was really cool and would add a little something to my card.  It does, but it also adds bulk.  Maybe I should hand out some of these cards.  I could use the excuse that they were bulky. ??  From the stamp set here, I also used the sentiment "For unto us a child is born, unto us a child is given." on some of the cards.  And then the inside sentiment for all of them, I used "May you be richly blessed this Christmas and always".  I ordered this set especially for this group. Not that these stamps are wonderful for everyone, they definitely are!  Do you like how it came out?

Recipe:

Paper - Simple Stories Handmade Holiday line: Holly is backside of "Holiday Flash Cards", and Green stripe is called "Blue Stripe" (why is it called blue if it is green??), Words are from 

Bazzill Blizard
Stamps - Verve Richly Blessed
Ink - Versafine Black, Encore Gold
Tools - Spellbinders Labels 18, Classic Circle
Other - Ribbon and Gold Wire from May Arts, Rhinestones or Pearls

I will be back tomorrow with another card! 
Happy Stamping!
Tina

Christmas Card Count:

From Classes - 9
Tree card (11/27 post) - 3
Candy Cane girl (11/28 post) -4
Skating bird (11/30 post) - 4
Reindeer (12/1 post) - 4
Bulb girl (12/2 post) - 12
Santa's Helper (12/3) - 6
Wisemen (12/8 post) - 4
Glory To God (today's post) - 17

Total so far - 63

Saturday, December 8, 2012

Saturday's Sketch Share!

Hello!  This was my teaching week, so you did not see me, but I did get time to do today's card before I started working on my class kits and then in the last couple of days I made an additional four of the one I am showing today to add to the card pile!  Speaking of my tag class, I did 5 less tags than in last year's class, but it still seemed like it took forever to get all the kits ready.  I am glad that I only do a tag class once a year, and that I can go back to cards!  Now, let's get to today's share.  I will show you my card, Debbie's card, and the sketch we both used.  Enjoy!
 
 
My Card

Debbie's Card
The Sketch
Both cards came out nice, I think.  Frankly, I wasn't sure about mine ... I liked it, but was it nice enough to do additional cards to send?  After Debbie had a chance to receive mine in the mail, I gave her a call, and she thought I should make more.  So, I did.  The bow on the sketch?  I thought it looked silly, but on the card, it so needed an element in that area!  And I have to say that the ribbon I found in my stash worked so great with the color scheme of my card.  Do you like the cards?  Since, I made more than one, I jotted down the recipe details for mine.

Recipe (my card):
Paper - Bo Bunny Snowfall 6 x 6 paper pad, Cardstock Blue, White, Brown
Stamps - Wisemen called Traveling Far: wood mounted stamp from Stampendous, sentiments by Verve Richly Blessed
Ink - Versafine Vintage Sepia, Versafine Deep Lagoon
Tools - Spellbinders Petite Oval
Other - Ribbon by May Arts, Rhinestones by Queen & Co., Gelly Roll glitter pen (on star)


I will be working on some more cards to send so I should be back early next week to show you what I have come up with.  Oh, I do want to make note, that I asked for suggestions for a good name for the obvious girly reindeer card I made on my last post ... my friend suggested Ruta!  Perfect! 

See you soon!
Happy Stamping!
Tina

Christmas Card Count:

From Classes - 9
Tree card (11/27 post) - 3
Candy Cane girl (11/28 post) -4
Skating bird (11/30 post) - 4
Reindeer (12/1 post) - 4
Bulb girl (12/2 post) - 12
Santa's Helper (12/3) - 6
Wisemen (today's post) - 4

Total so far - 46

 
design by suckmylolly.com
