Tuesday, December 30, 2014

Go Bananas!

Hello!  I have a cute card to share that I made for my niece who recently go engaged.  Enjoy!


How silly is that?  Just a couple of monkeys arm in arm, in love! If you look close, you can see I added a rhinestone on her ring finger!  Hope my card gave them a little giggle!

I will be back tomorrow to share some handmade cards that I got during the holiday season!
Happy Stamping!

Tina

Monday, December 29, 2014

Calendar Swap Page!

Hello!  Late last year I got asked to participate in a calendar swap when one of the participants opted out, so I did it.  Then, several months ago, I was asked again.  I said okay, but not thinking that I would have to have my page done right in the middle of making Christmas cards, prepping and teaching my class.  Oh wow, was I worried that I wouldn't get the 13 done in time, but I did.  I got a choice of which month I wanted and from the months that were untaken, I decided on May.  I knew I could do something with flowers or something for birthdays, as both my hubby and my birthday is in May.  Since it was my "month", I decided to go with colors I like, a favorite stamp, and flowers!   Enjoy!


Last week I got an email that I had made a mistake on my page ... you saw it right off, didn't you?  I bet you did!  And when it was pointed out, I felt like one big dummy!  So, I retyped the month with the correct year and cut them out, and ran them thru the xyron and sent them off so that my mistake could be fixed!  Yea!  Other than that, I love how my page turned out!  The white bunny (The Cat's Pajamas) made it simple to color, but yet it is whimsical and colorful. 

See you tomorrow.
Happy Stamping!
Tina


Sunday, December 28, 2014

Sunday Words of Wisdom!

Hello!  I am back today with a couple of  "you should do" quotes for the new year ...enjoy!


All good things to remember, now to just remember them, right?

See you tomorrow.
Happy Stamping!
Tina

Saturday, December 27, 2014

Saturday Sketch Share!

Hello!  I hope everyone had a wonderful Christmas with their friends and family.  Today I have another share between Debbie and I.  Enjoy!

My Card

Debbie's Card


The Sketch
Yes, it was another of those weeks where we had a choice between square or circle, but as you can see, square is the choice of the day!  Debbie's idea is a keeper though, as I think this would make a great Christmas card idea.  I am done with Christmas cardmaking for the year, so I went looking for any stamps that might work for a New Year's card.  Both the numbers and the stamp with the glasses are those cheap Studio G clear stamps, but it works!   Do you like today's cards?

See you tomorrow for the words of wisdom quote!
Happy Stamping!

Tina

Thursday, December 25, 2014

Unto Us A Child is Born!

Hello!  I saved one of my Christmas cards I made to share with you today ... enjoy!


Simple but elegant and a great way to say Merry Christmas to you and yours!
Happy Stamping!

Tina

Tuesday, December 23, 2014

Gift Card Holders + How-To Measurements!

Hello!  Every year I make some kind of gift card holder to put either a gift card or money into for the grandkids and others.  In my December class, I taught one, so I made all the others with the same measurements.  For the class one, we added a bow made from the We R Memory Keepers punch board, but for the grandkids, I just added a stamped circle to match the papers.  Here are the four I made, followed by the class one.  And followed by the measurements and the how-to!  Enjoy!


.
 
Gift Card How - To -

The measurements are 5” x 11”, scored at 2 ½”, 3 ½”, 4 ½”, 8 ½”. The belly band wrap around piece is 9” x ¾” and is scored at 1 ½” & 5 ¾” .
1. Laying your base with the score lines close together on the left side, it is a valley at the 2 1/2" score line, a mountain at the 3 1/2" score, a valley at the 4 1/2" and the last score line at 8 1/2" is a valley.   Flip the base over and add score-tape in the small fold.  See photo below ...


2.  Now on the front side you will have a joined piece sticking up.  You will need to make a small pencil mark 5/8" from either end.  For the grandkids that got money instead of a gift card, I made my two pencils marks at 3/4" instead.  Hold the word punch (Stampin' Up) about halfway in and punch at the left side pencil mark, and then punch again at the right side pencil mark, again hallway in.  Punch again or trim.  If you do not own the word punch, you could use scissors or an exacto knife, just make sure you don't go too far in. 
3.  That is it.  Just decorate!  Easy Peasy!

See you tomorrow!
Happy Stamping!

Tina

P.S.  I didn't repeat the how-to on the bow, but if you want directions for that, just let me know!


Monday, December 22, 2014

Tag to Card x 2!

Hello!  The last of my Christmas card stash came from three kits I had leftover from my last class. You can see all the tags in this post here.  The tree tag I didn't use because I knew the shaker part would take some time.  The angel tag I just added a fold-over back to it and sent it as is with the ribbon at the top and everything.  I thought I would change it into a card but decided that the simplicity of it would be lost, so I left it as is.  The transformed card with the girl is below and as you will see it very closely mirrors the tag, also below.  Enjoy!


Next, I have the gingerbread card transformed.  I found that if I changed the direction of the already cut pattern paper with the gingerbread men, it would perfectly fit on the card.  Playing around, I added the top of the pretty tag to the card, and liked it so, I went with it!   Enjoy!


I will be back for another post tomorrow!
Happy Stamping!
Tina

Sunday, December 21, 2014

Handmade Ornament with How-To!

Hello!  For the party at The Crafty Scrapper, we were all supposed to bring an ornament for an exchange.  It could be handmade or store bought.  I had a store bought one ready in case I didn't have time to try to make the one I saw on Pinterest or if it came out ugly.  It ended up being easy and pretty!  Here is a link to the one I saw.  The first problem is that this lady's blog is in Italian and the second issue was it wasn't a direct link to her blog post that showed the ornament.  After I found the correct post, I used my cell phone to translate it and then found out, she didn't include any instructions!  I did find another similar one on Pinterest with some directions, but I added strips to make mine fuller.  So let me show you my ornament and then I will give you the easy peasy how-to ... enjoy!


Here is the backside to better show you the strips ...


My How-To:

I cut two strips 1 inch by 7 inches, two strips 1 inch by 6 inches, two strips 1 inch by 5 1/2 inches, and two strips 1 inch by 5 inches.  I used scrapbook paper that I liked both sides of and so for the middle piece I glued the two 5 inch pieces together with the snowflakes showing on both sides.  I arranged the strips: 1 7", 1 6", 1 5 1/2", the double 5", 1 5 1/2", 1 6", and 1 7" lining them up evenly on one end.  I punched a hole and added a brad here while I was working on the ornament.  With the top secure, I added a piece of scor-tape on each of the bottom strips, also lining them up evenly.  As they are secured together, the strips being different lengths, naturally form into the ornament shape.  I then removed the brad I had added earlier and threaded ribbon through the holes to form my hanger.  I die cut 2 snowflakes (Spellbinders) out of glitter paper and also a stamped Merry Christmas (Hero Arts) on a sentiment panel, backed with a hot pink panel.  I got out my hot glue gun to adhere these to the front.  And last but not least, I added sticker glitter borders to the sentiment panel and small hot pink rhinestones to the snowflakes.  Easy Peasy! 

If you have any questions, be sure to ask!  Do you like my ornament?

See you tomorrow!
Happy Stamping!

Tina

More Santas!

Hello!  A couple of weeks ago, I showed you a couple of Santa cards I made, but I had not shown you the rest of the cards I made from the same set from My Favorite Things.  This first one is a card I cased from this one here.  Mine is slightly different, but it is pretty close. ...  Enjoy!


Love this!

I have two more to show you, which both are exactly the same, except for one has paper that really goes with the sentiment, but since the paper was from a partially used 6 x 6 pad, I didn't have enough to do more than one card.  I am showing you both cards ... Enjoy!


Favorite!
Paper Card #1 - Bo Bunny Mistletoe Line (last year's line, I think)
Paper Card #2 - Winter Wonderland 6 x 6 (2012)


Those Santa images are so adorable.  I have a Santa collection I put out in my house every year, so glad I finally have some cute Santa stamps too!

I will have another post for you later today!  Yes, that will make 3 for the today!
Happy Stamping!
Tina

Sunday Words of Wisdom!

Hello!  I have lots of creative posts for you, but I decided I should give you a words of wisdom post to start off the day with Christmas coming this week.  Enjoy!

And one more ...


Look for another post in about an hour and then another one about noon!
Happy Stamping!
Tina

Saturday, December 20, 2014

Treat Box Decoration!

Hello!  This is my second post today and this one is short and sweet.  I just wanted to show you one of the decorated treat boxes I made for the group of ladies that I crop with monthly.  The boxes came from Michaels.  I happened upon them one day and got a package not knowing if I would use them or not, but they were half price and the package contained 10 French fry style boxes.  Glad I got them because they were perfect to hold a treat bag full of Saltine Toffee and had a great front panel to add a fun decoration!  Enjoy!


I cut and colored the Santa,  (My Favorite Things), die cut the scallop circle, added the HO 3 sentiment and added the tag with twine.  Easy, and fun!

See you tomorrow for a couple of more posts!
Happy Stamping!
Tina

Saturday Sketch Share!

Hello!  I am just about done with all the Christmas creations.  I started on a card for the hubby but it is not finished yet, so I will still have to go to my room early next week to get that one finished but that is all!  When I saw the sketch for this week, I thought of a punch of a pine branch that I ordered during Black Friday to make wreaths with.  I am sure you have seen or probably even own it.  I think I sold a similar one in my store, but I have wanted it for a long time, so I got it.  But as my Christmas card making was coming to an end, I was wishing I had a few more religious cards in my stash, so I switched gears, which means I didn't use the punch, but I will, someday!  Here are the cards for the day ... my card first, Debbie's card, and the sketch we both used ... enjoy!
 
 
My Card


Debbie's Card


The Sketch
The die I used is just the center portion of a long border die from Taylored Expressions.  This is the first time I have ever thought about doing this.  But, I love the result.  I love Debbie's card too.  The patterns and colors remind me of Christmas from my childhood, not sure why, but they do.  The sketch is so simple, but I really do like it.  How about you?

Okay, I have figured out I have about 8 or 9 more posts to show you, and of them, at least 7 are my creations for Christmas.  So, I will have another for you today, a couple tomorrow and one a day after that.  And yes, I am writing them right now!

Happy Stamping!

Tina

Friday, December 19, 2014

My Tag on The Crafty Scrapper Blog Today!

Hello!  I have been a busy, creative girl this week!  Among the projects are the completion of my Christmas cards.  I had to cut some people which sucks, but I had to stop at some point and move to the next project, like gift card holders, an handmade ornament, and treat box decorations.  Also, on my list this week was to get to showing you some of these, but here is another day, I have simply run out of time.  I am heading out to go the store for a little party.  Will try to get a couple of things to show you tomorrow, well, in addition to the regular Saturday post. Don't worry though because I do have something fun to share today, as I am on The Crafty Scrapper's blog today ... here is that post ... enjoy!


Hello Everyone, Tina here, back with another tag creation for you.
 
This time I was given some fun and colorful papers from Doodlebug Design, which is a favorite company because a lot of their designs are small for card makers, like me!
 
I was given some cardstock stickers from the same line.  Now, rarely would I use these, as I own lots of stamps, but I thought okay, let's use them this time.  
So cute ...
 

Of course, I added sparkle with Stickles and the Wink of Stella glitter pen. 
 Then, the rhinestones and a stamped sentiment made my tag really come together. 
On Monday, I used the same tag set from Elizabeth Crafts but this time I did not put a layer behind to show though, which gives a totally different look.

Stop in at the store soon to see all the tag creations!
 
Happy Stamping!
Tina


Monday, December 15, 2014

Design Team Tag: Posted on The Crafty Scrapper blog today!


Hello everyone!  Tina here, with my tag for day #6. 
 
I was given some pretty papers from Authentique and a really beautiful chipboard snowflake ornament from Leaky Shed.  I just taught a tag class last week and used the tag set from Elizabeth Crafts.  I knew combining these would make one pretty tag ...
 

And it really is pretty, more so than the photo shows!
I lightly added aqua acrylic paint to the chipboard and then added stickles and pearls!
I love how with the tag set, it shows the coordinating paper through the opening of the front tag. 
It really adds a pretty element to the tag. 

I will be back on Friday for tag #10! 
Make sure to stop in soon to the store to see all the tags we are creating for you!
 
Happy Stamping!
Tina

:Last Saturday's Sketch Share!

Hello!  I have the post that you normally would see on Saturday.  There was a little card mix up between Debbie and I but it is all fixed now.  I will show you my card, Debbie's card, and the sketch we both used.  Enjoy!


My Card

Debbie's Card

The Sketch
I though it as interesting that Debbie and I had the same idea of using the wisemen for the main image.  Love how both cards came out!  I especially love the big star she used.  In person, it looks like a die ... I want it! 

I am on The Crafty Scrapper's blog today, so I am going to repost that on my blog following this post.  Be sure to look for it!

Happy Stamping!
Tina

Sunday, December 14, 2014

Sunday Words of Wisdom!

Hello!  Yesterday at Methodist Women's meeting, one of the ladies read a devotional that I would like to share.  It is a good reminder for us all.  Enjoy! 


It is called A Tip to Help You Simplify Christmas!  By Rebecca Barlow Jordan

This Son perfectly mirrors God, and is stamped with God’s nature. Hebrews 1:3 (MSG)

We’ve probably all tried to make Christmas a perfect celebration at least once: buying gifts the day after Christmas for the next year, devising lists to complement other lists. Decorated trees with color-coordinated ornaments appearing in every room by October. And the entire house filled with candles, music, and lights.

I remember years ago when our children wanted a perfect Christmas tree, sort of like Goldilocks at Christmas: “Too short, too tall; oh, this one is just right.” It would have been so simple if we’d had only three trees to choose from. But we had to examine all 250 trees in the lot before we found that “perfect” one. And it had to be  fresh—one that we’d cut ourselves. That tradition ended the day I found ticks spilling out of every tree limb onto my windowsill and carpet.

The next year, we bought an artificial tree, still in use. The circumstances surrounding that first Christmas over 2,000 years ago were anything but perfect. An overcrowded city. A messy barn. Noisy animals. A teenager in labor. Yet the night was accompanied by a powerful, twinkling star, a host of heavenly angels, and the fragrance of a Holy God (Luke 2:1–20).

The one thing that mattered about that heavenly event still matters today. The One born that night was God’s perfect gift to us—the Light of the World, Jesus. It had been God’s perfect plan all along. Traditions are okay, as long as our focus is right. It’s not the outward traditions of Christmas that spell perfection, but the inward celebration of the birth of our Savior, Jesus, the perfect Son of God.


Tomorrow, I will be back with the Saturday sketch share from yesterday and also, a second post that is a copy of the post that is on The Crafty Scrapper blog tomorrow.  And Tuesday, I will have two more Santa cards.  I am getting close to finishing my cards, not quite there yet, but close. 

Happy Stamping!
Tina

Saturday, December 13, 2014

Santa x 2!

Hello! I have some good news and some bad news.  Bad news first, this is a Saturday and you always get a sketch share between Debbie and I on Saturdays, but this week we had a little mix up on which sketch was the next one and we did different sketches, so you will have to wait a day or two for the share.  The good news is I have a couple of Santa cards that I made to show you!  I ordered the awesome set from My Favorite Things during the black Friday sale and I made with the same set four different cards with multiples of each to send.  I have two of the four for you today.  The other two I will show you real soon.  I have a Santa collection here at the house, so it is fitting that I finally have in my stamp collection Santa  stamps!  Enjoy! 


Oh my gosh, I adore these stamps!  On the first card, I originally thought of a die I have that is a border of jingle bells, but it ended up being too big for him, so I went looking.  The stamp I used came from a Stampendous set of snowman stamps and really, I think it is supposed to be a string of lights, but adding silver Stickles, I decided ...looks like bells to me!  What do you think?  The set of stamps has three different Santas, as I am showing you two of them here.  The second card, is a fun one too!  On the simple side, but I love it! 

See you tomorrow! 
Happy Stamping!

Tina

Monday, December 8, 2014

Design Team Project Posted on The Crafty Scrapper Blog Today!

Hello, it's Tina here to share with you today. 
 
 We were given a challenge to decorate snowflakes and stars made out of Smoothfoam for the store. 
I have to admit I did fret over this project, as I am better with paper.  And then I thought, why can't I make mine with paper too, and that is when they started coming together. 
Here are my two favorites ...
 

Both of these were painted all over with metallic acrylic paint.  The silver star was then decorated by adding an adorable angel stamped image in the middle.  I added the letters to spell PEACE with Thickers letters and added the sticker borders around the edges.  I colored both the letters and the borders with a red Copic marker. 

On the second star, I added  a poinsettia die cut from glitter paper and a Happy Holidays sticker.
 
Both stars have fancy tied ribbons which I cannot take credit for.
  A friend helped me out, as I am not a bow-maker.  Thanks Dianna!
 
For the third one, I decided to do something different. Not really a good idea, as I thought the finished piece looked like something a 10 year old made.  So, brace yourself ...
 
 
I went glitter CRAZY!  I used 19 different colors!  On a good note, I did get to use a lot of glitters that were in my stash.  After finishing the front, and getting glitter EVERYWHERE, I decided to just do clear glitters on the backside. 
 
When I finished the glittering I didn't like it but I thought I could make it better by adding color on the sides.  No, for sure, I made it worse! 
 
Be sure to check out all the snowflakes and stars creations at The Crafty Scrapper!
(And remember, you have my okay to give a little giggle when you see my snowflake!)  
 
Happy Stamping!
Tina


Saturday, December 6, 2014

Saturday's Sketch Share!

Hello!  I am back with another share between Debbie and I.  I will show you my card, Debbie's card, and the sketch we both used.  Enjoy!

My Card

Debbie's Card
 
The Sketch
Two snowy scenes, but oh, so different!  I love how both cards turned out this week.  And I think we both liked the sketch.  It is a little bit on the clean and simple side for me, but a good one for this time of the year, when you are trying to make multiples of the same card.  This time I added five more to my stash of cards!  What do you think?  Do you like the cards, the sketch?

Happy Stamping!
Tina

Friday, December 5, 2014

Marley Moose x 3!

Hello!  I got a couple of new stamp sets recently.  I am showing you one of them today and three different cards I made with it.  I also made more of each one, as I am working on my stash of cards to send out.  When I first get a new stamp set, I usually go to the internet to find card ideas that others have made or look at sketches that would fit the size of the image. Sometimes I just have an idea about one as soon as I see it.  Which ever way, I usually pick one idea.  But, for this stamp set, I couldn't decide which one to do, so I went with three!  Two are sketches that I thought would be perfect and one is a case (copy and share everything), which I will link.  Here is the first of the two sketch ones ...


I paper pieced his scarf and mittens to match the paper.  The ribbon was added mainly because I get a little black ink on the fully colored panel, and I was trying to cover it up.  but, I like the addition, which makes the ribbon a "happy mistake"!  You can't see it, but I did add a little clear glitter on the two red bows.  This paper was some that I was given for the design team to make cards with, but I thought the "sweater" like pattern was a good fit for Marley's sweater! 

Next, is a simple card, but just as cute ...


On this one, I just colored to match my papers.  This one came about because I thought that diagonal paper would fit on a Marley card nicely, but I only had one 6 x 6 of it, so I found a sketch that I could use a small portion and still make several cards. 

The last idea is from a card I cased here.  I loved the concept but hers is little too clean and simple for my style, so here is mine ...

 
In a lot of the 6 x 6 pads, there are papers that look like wood grain, but I went through all my pads, and I could not find any, at least not any that were the dark brown color I was looking for.  So, my next search was for a wood mount stamp from Hero Arts.  I found it and stamped on dark brown paper ... perfect!  See the snow?  They were created with a set of new dies from MFT!  I also did a little paper piecing on the gift. 

I love how all three cards came out!  Marley is one cute guy!


Recipe:  (Note: Most all the papers were from my stash, only the papers from card #1 are new)
Card #1 -
Paper - Autentique Cozy Collection, "Flurries", "Bundle", Cardstock Red, White

Stamps - Reverse Confetti Quirky Cuties Marley Moose
Ink - Memento Black, Copics
Other - Ribbon by Creative Impressions, Red Rhinestones, Wink of Stella Glitter pen

Card #2 -
Paper - Echo Park 6 x 6 Holly Jolly Christmas (from 2011), Simple Stories Green Snowflake, Cardstock White, Green

Stamps - Reverse Confetti Quirky Cuties Marley Moose
Ink - Memento Black, Copics
Other - Green Pearls, Wink of Stella Glitter pen

Card #3 -

Paper - Bella Blvd. Christmas Countdown, Brown (backside of American Crafts DP), Carta Bella Merry & Brights (2012)=tiny paper for gift,  Cardstock White, Red
Stamps - Reverse Confetti Quirky Cuties Marley Moose, Hero Arts Woodgrain

Ink - Memento Black, Copics, Tim Holtz Distress Gathered Twigs ink (for woodgrain)
Tools - My Favorite Things Stitched Snowdrifts
Other - Green Pearls, Wink of Stella Glitter pen

I am off to make some cards with my other new stamp set!  I will see you tomorrow for the sketch share.

Happy Stamping!
Tina

Monday, December 1, 2014

Decenber Class Share!

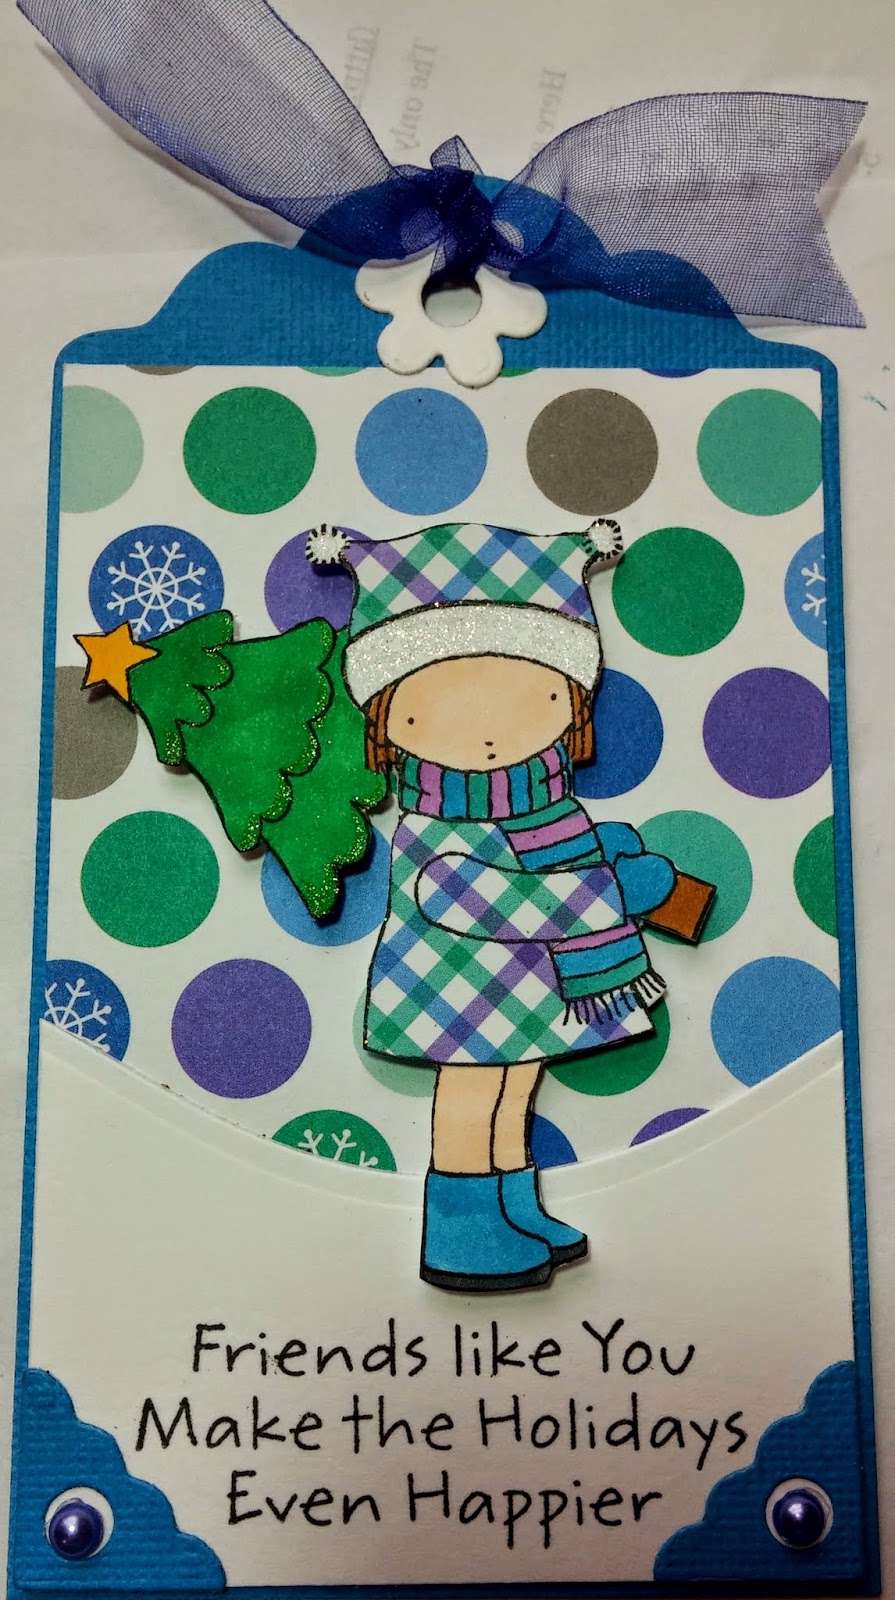
Hello!  Yea, I am finally done with my class samples.  It's about time since my first class is just 10 days away!  As I have done in the past, I knew for my December class, I wanted to do tags and a gift card holder.  But, every year, it is not until I get started on them that I realize tags are just like doing cards, at least the way I do them!  I looked at so many gift card holder ideas and then made them with the instructions I found, but most were either too small, wouldn't stay closed, or too much trouble.  I finally settled on one but changed the size.  I think it is an easy one to teach and one that will be super simple to recreate.  So here are my tags and gift card holder ... enjoy!

Tag 1 is s SHAKER!

Tag 2 is GINGERBREAD cute!

Tag 3 is PEACEFUL!

Tag 4 is a cute girl with a PLAID coat!


Gift Card Holder Closed
 
Gift Card Holder Open with Gift Card POPPED UP!
I love how they came out.  And I am so glad to have them done so I can go to the next item on my list!  Below are the class details, if you are interested and remember even if you can't come or don't live local, you can always get a kit. Last month I made 20 kits and sold them all!  Once their gone, they are gone.  If you want to sign up to take the class or will be picking up your kit at The Crafty Scrapper, call the store at 972-923-3151 to sign up.  If you aren't local and want a kit, contact me by Monday, the 8th and I will make you one and send it to you.

Creative Gift Helpers 2014 - Wed. Dec. 10th 11:00 a.m. and Saturday Dec. 13th 2:30 p.m.  $25
In this class, you will make four creative and unique tags and a gift card holder using favorite dies and stamps.  All tags are made with Elizabeth Crafts Tags & More die set and include fun techniques like a shaker card and paper piecing.  The gift card holder features an inside pop up and the outside bow is a refresher on making bows with the We R Memory Keepers Punch Board.  Please bring adhesive to include scor-tape, 3M Foam tape,  glue dots, an X by Xyron (if you have one), detailed scissors, and your favorite coloring medium.  Copics used (only listed for those who what to know what I used ahead of time)  E00, G17, V15, B14, BG57, C7, E35, Y17.

I hope to get more Christmas cards made this week so I will see you soon when I have some to show you.
 
Happy Stamping!
Tina


design by suckmylolly.com