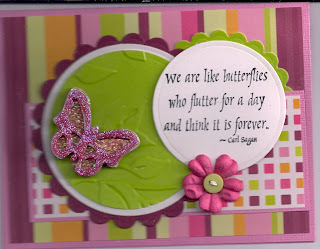
Hello! Yes, I know, I am late posting this week. I do have an excuse! At our house, we had new flooring put in and so the house was in total disarray, keeping me from the computer. I did, however, get to my stamp room to work on today's project. Over the weekend, I made invitations to send out. The main focus on the card was the glittered 50! And that is what I want to talk about today! My friend, Eileen, shared with me a tip she saw somewhere, and it worked so well, I knew I had to pass it on to you! First, let me show you my glittered 50 ...
 In my case, I cut numbers using the Cricuit (borrowed). For today's demo, I will be using some chipboard shapes from Maya Road. Are you ready for the great glitter tip?
 Following how I did the "50", I put Glossy Accents (by Ranger. Other comparable products also work. Like Diamond Glaze by JudiKins) on the chipboard.
 And then I added glitter, tapping off excess into a tidy tray.
 On Jen delMuro's blog, I saw where after the glitter was dry, she added another layer of Glossy Accents. I did try that, but I didn't think it added that much. I guess this would be an idea if you didn't want any glitter to fall off but really, the adhesive seems to hold the glitter really good. Or maybe you just like the solid glazed look. You will have to try it and see which way you like it the best. (One note, do wait until glitter is set up, before adding this extra layer of glaze. I tried one while the glitter was still wet, and it gooed (is that a word? LOL!) all over the place!) Also, I want to note, that I tried coloring one of the shapes with white staz-on first, thinking that it would change the look of the transparent glitter. I did not seem to. I thought that was interesting. In the pic below, the two top butterflies has the Crystal Effects on top of the glitter. The one on the right is an opaque glitter giving the butterfly a different look.
 To sum up, my tip of the day is every time, you want to add glitter or a messy product to a shape, first adhere it to cardstock with a strip of removable tape! You will be glad you did!
Recipe:
Paper - Provo Craft Juicy Squares & Juicy Stripes, Cardstock White, Lime, Pink, Wine
Stamps - Butterfly Flutter by Stamp Camp
Ink - Versafine Black
Punches/Dies - Nestiblities Classic Scallop Circles and Classic Circles, Cuttlebug Folder (leaves)
Other -Chipboard Butterflies by Maya Road, Glossy Accents by Ranger, Transparent Glitter by The Art Institute, Flower by Prima, Button, Twine by The Cat's Pajamas
Happy Stamping!
Tina


0 comments:
Post a Comment