Saturday, August 31, 2013

Saturday's Sketch Share!

Hello!  Before I get to today's share, I want to tell you some nice news.  Remember the patriotic cards that Donna and I made for the Blue Star Mother's convention?  I am happy to tell you that Cheree, the president sold ALL 44 cards at $5 each!  And that money paid for all the boxes we sent to the troops this week!  Woo Hoo!  Now, on to today's cards.  I will show you my card, Debbie's card, and the sketch we both used.  Enjoy!


My Card

Debbie's Card

The Sketch
I love the look of the sketch.  And I love how both of them came out.  When I saw Debbie's, I thought maybe I could follow suit and do a back to school theme, but didn't really have anything for the occasion.  I resorted to just looking thru some stamps to see if anything jumped out at me.  The mouse did it!  I found the paper with the tape measures on it and the card just came together.  What do you think of this week's sketch, do you like it?

I am off to Waxahachie to teach my second class of the week.  Have a great weekend!
Happy Stamping!
Tina

Sunday, August 25, 2013

Art Project - Middle Steps to Completed!

Hello!  For over a month I have been talking about an art project I have been working on which is for a collaborative book for an art group I was a member of several years ago.  They are celebrating 20 years and have asked all current and past members to participate.  I did a post all about it, including the process of my idea, and the first steps in a post on July 18th.  Go here to see it.  I tried to take some pics of along the way, so I have them to show you and the completed page!  So, this is your warning  ... if you are part of the Banders art group and you don't want to see my page ahead of time, turn away!  Truthfully, I don't know if anyone associated with the art group, even reads my blog, but just in case.  Now, back to where I left off on the last post ...

Below, is the page I had showed you from the 7/18 post. I noticed in the original instructions it said to leave about 3/4" to an 1" on the left side for the binding to be added, so I had to change the layout to allow for that and to also get everything to fit.  The next pic shows the new layout. I also want to note here, that I didn't like the backside of the piece, because it had paint drippings and such.  It just didn't seem finished to me.  So, I added a white cardstock panel on the back.  Perfect and it makes it sturdier too.  I did change the front stamped sentiment to "It is good to have an end to journey toward; but it is the journey that matters in the end." I think this better suits the whole page's theme.  As, the background is the "artsy" type art I once did, and the inside card is my style now, both being a part of my artistic journey.  Make sense?


I know I showed you a pic of the suitcases die cut.  Well, for each one, I had to score and cut 1/4" off to make them so that they would not be so tall.  I then used scor-tape to adhere all the sides.  But, the scor-tape didn't work on a lot of them, so I had to go back and add Crystal Accents (Ranger) too.  Then to make them really look like a suitcase, I added two small strips just on the front, and then a piece in the middle of them to create the fastener.  A small brad, a hole punched through the cardstock and then adhered on the backside.  Plus, I had to add the handle piece.  You can see what I mean in the last photo.  But, first, I have to talk about the card that I put on the inside of my suitcase.  Here is a pic of all the pieces before I put them into a finished card ... 


Now, here is the finished card ...

Front of the card
Inside of the card


This inside card only measures a little less than 3" x 4", but I wanted it to reflect the kind of cards I make everyday, so it had lots of layers and even the "out of the box" technique.  I used the Stampendous stickers for the headlights.  Love the effect.  And the inside sentiment goes right along with the artistic journey theme. 


And now here is the pic of the finished piece .............

Drum Roll please ......................


And with the suitcase opened ...

All my friends thought my whole idea was CRAZY since I had to make 30 of them!  But, once I get an idea in my head ... well, there is no changing, I have to do it!  I don't know how to think another way.  Ideas in my head are not in clean and simple styles.  But, you know what?  I got started early and did parts of it over time and so it made it not so hard to make 30.  In fact, I can't even believe that I did make 30!  And, that I am done EARLY!  (2 weeks, in fact!)  That is crazy in itself, because I am never early with anything ... I am always the procrastinator.  Proud of me and proud of the finished piece.  All original, no color copies.  I hope that there are not a lot of color copying in the book, because that will be a little disappointing.  I probably want get the finished collaborative book until October, but when I do, I'll post pics from it!  Thanks for letting me share my book page with you!

This week is my teaching week, so you probably should not expect to see me before Saturday.  I am off to prep my classes now.  Have a great one!
Happy Stamping!

Tina

Saturday, August 24, 2013

Saturday's Sketch Share!

Hello!  I am back today with another Saturday sketch share between Debbie and I.  This is another one of the weeks where we had a choice between circle or square.  Debbie and I both went with the 4 1/4" square card.  Let me show you ... enjoy!
 
 
My Card

Debbie's Card

The Sketch
I got this set of adorable owl stamps at the store last time I was there!  I love owl stamps!  (as you know ...LOL!)  It is from Darcie's!  It made a perfect card for me.  Love Debbie's star idea!  Great cards and a nice sketch.  What do you think?

Guess what?  You know the art project that I have been working on for over a month?  It is DONE!  Woo Hoo!  Look for a post from me today or tomorrow showing my finishing steps. 

Next week is my teaching week, so I will probably by mia until next Saturday.  Have a good one!
Happy Stamping!

Tina

Friday, August 23, 2013

With Sincere Condolences!

Hello!  Today I have a sympathy card I made.  It was sent to a man, so it had to be not only simple, but in colors that are more masculine.  I think it came out nice.  Here it is ....enjoy!
 

I have used that Authentique 6 x 6 pad with blues, greens, and browns for numerous occasions, including Father's Day (originally used in a class), birthday, and now sympathy.  It is great to have a "go - to" paper for when you need a general masculine card.  I added the die cut leaf because I felt it needed a little something.  I think it came out nice.  Don't you?

Recipe:
Paper - Authentique Loyal 6 x 6 pad, Cardstock White, Brown
Stamps - Impression Obsession

Ink - Memento Black
Tools - Spellbinders Foliage 2
Other - Rhinestones by Queen & Co.


See you tomorrow for the Saturday sketch share.
Happy Stamping!
Tina

Thursday, August 22, 2013

Sending Get Well Thoughts!

Hello!  Today I have the last of three get well cards I have been showing you the last couple of days.   The layout is from a card I saw on Pinterest.  Love that source for great ideas!  While I am on the subject of Pinterest, remember if you see a card that you like here on my blog and you want to "pin", all you have to do is send your mouse to the top left corner of the card and you will see a "pin it".  Just click on this, and it will "pin it" to your board of your choosing.  I try to remember to pin my cards onto my board called "my own creations".  If you want to see all my boards, you can always go to my pinterest boards, by clicking on My Pinterest on the right side of my blog.  O.k., let's get back to my get well card.  Here it is ...enjoy!


I love how this one came out.  As you know, usually I do my base in white and then add color cardstock from there, but this time I did the base in brown, and then added a white panel, and then back to brown.  I love the effect.  But, no, I won't be changing how I usually do it, because the main reason, I do it the way I do, is that the white cardstock I buy by the ream, so it is much more cost effective.  This is a nice change, if I do say so myself!  What is your favorite way to do cards, white base or color? 

Recipe:
Paper - Simple Stories Vintage Bliss 6 x 6 pad, Cardstock Brown, White, Aqua, Peach
Stamps - Verve (flowers), Rubbernecker (sentiment)

Ink - Versafine Spanish Moss (for the whispy leaves), Memento Black, Copics
Tools - Spellbinders Circles
Other - Pearls by Queen & Co.


Tomorrow I have a sympathy card to show you.
Happy Stamping!
Tina

Wednesday, August 21, 2013

Add Sunshine to Your Day!

Hello!  I am back today with another get well card.  This one is centered around a get well sentiment stamp that I got earlier in the year at one of the conventions.  Actually, it really isn't surprising that I picked this sentiment, because it seems every year, I am drawn to some group of stamps.  One year, it was animals.  This year it is sentiments about sunshine.  In fact, I have thought about making some kind of mini book or a collection of cards about sunshine so I could use all the sunshine stamps I have!  But, today I have a just a bright and sunshiny card for you ... enjoy! 
 

I told you it was bright!  I picked out papers and then after coloring, I decided it needed brighter papers to match, so I found this great stripe in my stash.  Love how it came out, brightness and all!  Do you like this one?

Recipe:
Paper - We R Memory Keepers 72 & Sunny Line: "Rainbow" (said it was from 2010), Cardstock Orange, White, Yellow
Stamps - Sentiment by Rubbernecker, Flower/Sun image by Inky Antics Swirly Sunshine & Flowers
Ink - Memento Ink, Copics

Tools - Spellbinders Circles, MFT Scallop Edging die-namics
Other - Yellow Pearls

See you tomorrow for another get well creation!
Happy Stamping!

Tina

Tuesday, August 20, 2013

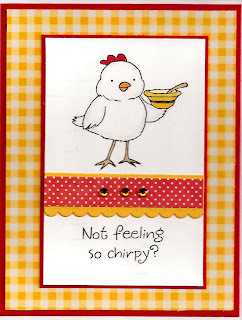
Not Feeling So Chirpy?

Hello!  Last week, I spent one day making three get well cards for my friend at church that buys my cards from me.  She had told me at least two weeks ago she would like to have some get well cards, and I knew that I had better get to making them for her!  Today's card is one of those three.  It is a little bit silly and I was worried that she would not like this one.  But, on Sunday when I showed them to her, she said she liked them all.  Yea!  So, here is my card ... enjoy!


I forgot to copy the inside ... it reads ... "sending you a bowl of get well wishes mixed with love".  I think this is just an adorable set of stamps.  It actually is one of the HoneyPOP sets, but as you can see, you don't have to do the pop up type card, to make it cute!  I love how this one came out, don't you?

Recipe:
Paper - Pebbles Basics line: Honeycomb Dot (yellow check), Echo Park Happy Days 6 x 6 pad (red dot), Cardstock White, Red
Stamps - Inky Antics Chicken Soup HoneyPOP
Ink - Memento Black, Copics

Tools - Spellbinders On the Edge Border
Other - Rhinestones

See you tomorrow for another get well card creation.

Happy Stamping!
Tina

Saturday, August 17, 2013

Saturday's Sketch Share!

Hello!  I am back today with another share between Debbie and I.  Let's get right to it ... first, my card, then Debbie's and then the sketch we both used.  Enjoy!


My Card

Debbie's Card

The Sketch
Given a large enough space to add a Pure Innocence girl, I am there!  Gotta stamp them so I don't feel so guilty having so many of them!  LOL!  I really liked this sketch.  This is definitely one for the "go to sketch" file!  What do you think?

I made a few get well cards for my lady at church that I make cards for, so I will have those to show you next week.  And I worked a little on my art project, but in the next few days I have to really get after it because I am not even close to finishing and the deadline is very quickly approaching!  The granddaughter is most likely going home on Sunday, so it will be back to normal soon.  I love having family here, but I am ready for just some quiet time too! 

See you soon!  Have a great weekend!
Happy Stamping!
Tina

Wednesday, August 14, 2013

Three More for the Patriotic!

Hello!  Today's post is a follow up to yesterday's.  So, if you missed that one, scroll down to see the details.  Here are the promised patriotic cards for you ... enjoy!


I sure hope some of these will sell at the convention.  I will let you know the results. 

Happy Stamping!
Tina

Tuesday, August 13, 2013

Two for the Patriotic!

Donna and I have gotten together several days over the past couple of months to make a series of cards that the Blue Star Mothers president is going to try to sell at the convention this week.  All proceeds will go toward postage to send care packages to our troops.  We ended up with 44 cards which means there are 11 different ones, quantity 4 of each.  2 of them were leftovers from extras that were made for care packages for the last two packaging times (they send care packages quarterly and every care package includes a thank you card).  We just had to rework them the insides so they were ready to sell.  1 was the patriotic class card from my June class that I had two extra kits for, so with those and our two, we had the quantity we needed.  I showed you 3 of the cards on my posts of 7/3, 7/4/and 7/5.  That leaves 5 more to show you and I have the first 2 today!  Here they are enjoy!


As in the July posts, I don't have the recipe details, but if you need them, just send me an email, and I will get the recipe for you.  See you tomorrow for the last 3!

Happy Stamping!
Tina

Saturday, August 10, 2013

Saturday's Sketch Share!

Hello!  I am back with another sketch share between Debbie and I.  So, let's get right to it.  I will show you my card, Debbie's card, and the sketch we both used.  Enjoy!


My Card

Debbie's Card

The Sketch
I think it's pretty fun that both our cards have animal images.  I think we both really liked this sketch.  And you can see why, as the main image piece is quite large so there is plenty of room to put almost anything in it, and there is enough other elements to make it interesting.  What do you think?  Do you like our cards and the sketch?

I finally got a chance to go back to working on my art project (see post of 7/18), so I will be working on that, next, probably every chance I get, as there is still a lot to do.  Donna and I got together early in week and finished some more patriotic cards that the Blue Star Mothers president will try to sell at the convention.  So, I hope to get those posted early next week for you. 

It has been so hot here ... some days as much as 104.  But, today we are supposed to be getting a cold front!  It will be 99!  Only if you don't live in Texas, would you laugh at this, because we Texans know that under 100 makes a world of difference.  I am so ready for it!  Try to stay cool and I'll see you next week!

Happy Stamping!
Tina

Friday, August 9, 2013

August Class Share!

Hello!  Once again, I have been doing other things besides blogging, like spending time with the granddaughter who is here for a couple of weeks, buying a car (a 2012 Chevy Malibu ...woo hoo!), and creating my class cards.  At least I have them to show you today!  August is my last month to make general themed cards before I have to start in with the holiday class cards.  I didn't really have any ideas what I wanted to do.  I picked up some pretty papers at the store and thought maybe I could come up something ... well, I sure did and I made the class about those pretty papers.  I combined them with some variations of past fun folds and some Pure Innocence stamps from MFT that I have used in previous classes.  It was fun to get to reuse some of them in new ways!  The "paper" idea all started when I found two new paper pads from Carta Bella with a western theme, one for girls and one for boys.  That is how this class became 4 cards instead of my usual 3!  Let me show you all four cards  ... enjoy!

Cowboy Twisted Easel Card Closed

Cowboy Twisted Easel Card Opened

Cowgirl Twisted Easel Card Closed

Cowgirl Twisted Easel Card Opened

Daisies Double Display Card Closed
Daisies Double Display Card Opened

Blooming Tent Card Closed

Blooming Tent Card Opened

Blooming Tent Card Inside
I think they all turned out pretty darn cute!  Did you recognize the Pure Innocence stamp in the third card?  She is actually holding a basket full of eggs (for Easter), but I changed the theme by adding some tiny flowers.  On the second card, that middle panel with the girl stamped on it, opens up so that you have a place to write your sentiment.  Thanks for letting me share here and in case you are interested in coming or in a kit, here are the class details:

Paper Pretties - Wed. August 28th 11:00 a.m. and Sat. August 31st 2:30 p.m. $25
In this class, we will be combining the prettiest papers with variations of past techniques and favorite Pure Innocence stamps from My Favorite Things to create four creative and unique cards.  First up, is the new western theme paper pads, which is being combined with a Twisted Easel card variation.  You will be making two cards here, one cowboy and one cowgirl!  Next, is a very pretty daisy paper.  You will be making a card that is called a Double Display card, but to me it is a variation of the Tri-Shutter card.  And lastly, pretty floral papers in greens, will be combined with a variation of a Tent card.  Please bring adhesive to include an X by Xyron (if you have one), pop up dots, a quicky glue pen or some kind a adhesive to adhere tiny pieces, detailed scissors, and your preferred coloring medium.  All other supplies provided. 
(copic colors I used: card 1 Boy: E00, E59, R37, B000/BG10, B97, C3, card
1 Girl: E00, E59, R85, B000/BG11, R83, C3, E33, card 2: E00, C0, B21, B23, YG25, Y15, E33 card 3: E00, E35, G02, Y15, E31 (flowers: Y15, B79, RV66, Y17, RV14) ...these are listed only for the convenience of those you have asked me to share the colors I used).

See you tomorrow for the Saturday's sketch share!
Happy Stamping!
Tina

Saturday, August 3, 2013

Saturday's Sketch Share!

Hello!  Wow, this has been a busy week!  But, not stamping!  In fact, I was only in my room long enough to create my sketch card that I am showing you today.  You see, my stepdaughter, her better half and the grandson, decided they wanted to come to our house for their vacation.  They were here from last Saturday to this Wednesday, and we stayed busy the whole time.  On Monday, we even drove to Monroe, LA to see the Duck Dynasty headquarters.  Not my pick, but we sure had fun.  Just a share from me to let you know why I have been "MIA"!  Now, lets get to today's cards.  I will show you my card, Debbie's card, and the sketch we both used.  Enjoy!
 
My Card

Debbie' s Card

The Sketch
It was such a great sketch, I think, to be able to stamp a special sentiment and then also, show off some pretty papers.  Speaking of pretty papers, Debbie told me her background papers were made using the Dylusions Mists.  Wow, how creative.  Me ... I just went with one of my favorite 6 x6 pads with all the papers that coordinate with each other.  I love how they came out and I think this sketch is a keeper?  What do you think?

Have a great weekend.
Happy Stamping!
Tina

 
design by suckmylolly.com