Thursday, June 30, 2011

Good Things Come To Those Who Bait!

Hello!  I have a "guy" card for you today.  I got this Flopsey Fishing stamp a while back that I have been just itching to ink!  I pretty much cased a card I saw on Jackie Pedro's blog.  You can see her card here.   In fact, it just so happens I used the some of the same papers she used too.  So, let's get to it!  Here is my card.  Enjoy!


I love the sentiment I used from the set.  But, they have two other fun sentiment choices too, so I will just have to stamp this fishing guy very soon so I can stamp out the other sentiments!  I love the way my card came out ...too cute ... don't you think?

Recipe:

Paper - October Afternoon Campfire Line Stars called Tent Trailer, Stripes called Camp Store, Cardstock Dark Aqua, White
Stamps - My Favorite Things Flopsey Fishing
Ink - Versafine Black, Prismacolor Pencils, Gamsol
Tools - My Favorite Things Die-namics Dainty Dots die, Sizzix Stars Die
Other - Pearls by Queen & Co.

I love all the blogs and I get such inspiration from all the talented people.  Last week, I saw on Jessie Rone's blog a great idea!  Every Friday, or I assume it's every Friday, she does a Forgotten Stamp Friday post where she uses a stamp she hasn't used in at least six months.  And she has a linky tool where other bloggers can do the same on their blogs and link their card to her post.  I am thinking that I should participate.  So, that is my plan if I can get out to the stamp shack today!  Hopefully, I will see you tomorrow!

Happy Stamping!
Tina

Wednesday, June 29, 2011

A Little Organization Share!

Hello!  The last couple of days, when I have been in my stamp shack, I am thinking about all the card ideas I have, and the fact that I have to get a couple of birthday cards made and sent by Friday.  So, do I work on them?  No, I work on something entirely different!  Stamp stuff organization is an on going process, as you know.  A while back, I started putting some of the Spellbinders nestibilities dies, that I don't use as often, in some CD cases, as I found out my hubby has a huge box of empty CD cases he said I could use some of!  (Remember my hubby's hobby is music.)  So, I found that most all the nestibilities fit very well in these.  Wal-mart has packages of magnet sheets that can be cut to fit the CD cases to hold the nestibilities in place.  So, it works for them.  But, lately, I have purchased many border dies from companies like My Favorite Things, The Cat's Pajamas, and Taylored Expressions.  Note here that I have quite a collection from My Favorite Things, as the store I am teaching at, is carrying their line of stamps and dies.  These dies are about 6" long and they do not fit in the CD cases.  Well, I guess one would at an angle but how about all the others?  So, my thought was ... maybe I could make a book to hold them all in one place!  When I had my store, we bought all kinds of clear envelopes in all kinds of sizes to either resale or use for merchandising.  I have the big box of leftover clear envelopes and bags in my shack.  The ones I ended up using for this project are actually taller than the die which I think works fine but the envy was also a lot wider than I would have liked.  But it works.  I found some bright pink cardstock in the ex-Imprints box which means free and not waisting my good cardstock!  I cut the cardstock to fit the envelope and used the tape at the top of the envy to secure the cardstock in.  Then I cut a strip of magnet to hold my die. And, used my label maker to add the die name to the outside of the envy.  I made the outside front and back by just covering pieces of chipboard and added "my border dies" title to the front with some thickers I have in my stash.  The front is still kinda plain but I can spoof it up later, as I just wanted to get the book done so I could show that to you.  Here are my pics!

The Front

Shows Top of Clear Envy

Envy with die inserted and label

Shows how thick book is.

3 Pages are ready to add more dies.
That is my share for today.  I have no idea until I am in the middle of a project, whether this idea is a workable one or not.  I will just have to wait and see.  But, this project cost very little.  The magnets -$2, part of one scrapbook sheet, and then the envys, the cardstock, the chipboard all came from ex-Imprints stash so that means paid for a long time ago, and then 6 rings of the one inch size for the bind-it-all.  So, basically, if I don't like it, I won't feel that I wasted a lot of money, just a little time.  And the time, I enjoyed! 

Hope to be back tomorrow with a couple of those birthday cards I need to get to!

Happy Stamping!
Tina

Saturday, June 25, 2011

Saturday's Sketch Share!

Hello!  I am back to show you Debbie and my card for this week's challenge.  As you know, we are working our way through the Mojo Monday's sketches from 2010.  And this week marks the last sketch of March 2010.  The last week of every month, the sketch always consists of a choice between a square or a circle.  Same sketch, just a different size card.  Yes, I almost always go with the circle size and this week is no exception.  I think Debbie usually does the square layout, but this week she did a circle one.  I love how hers came out.  Let's get to it.  Enjoy!

My Card
Debbie's Card


The Sketch Choices

I am not sure if I like the way mine turned out or not.  I would say that the sketch was pretty busy to try to do the panels on such a small card.  But then again, Debbie did the same sketch, and hers worked great!  That bear stamp I used is one of those Imaginisce dollar stamps that I tend to buy and never use.  It is teamed up with their matching scrapbook paper line called Happy Camper.  I just happen to have the words from a Cat's Pajamas set that says Happy Camper so I added it!  I might try it again in the square card size ... sometime!

Have a great rest of the weekend.  I am off to make the drive to Waxahachie to teach my class at The Crafty Scrapper!  Woo Hoo!

Happy Stamping!
Tina 

Friday, June 24, 2011

With Sympathy!

Hello! Have you missed me this week? If you read Sunday's post, you knew that I expected to not have a lot of new creations to show you this week. I knew Monday and Tuesday would consist of getting the class kits ready, Wednesday was my class, and yesterday I rested. I did manage to get the Sat. Sketch card done yesterday morning so I will have that for you tomorrow. Today's card is one I made to show a friend an idea for a sympathy card layout that I have done before. Yes, I doing a "case" on my own card. You can see it here. And here is the new card I made. Enjoy!


Isn't it interesting how different papers can change the whole look of a card? The other thing that is so crazy is that because I used this layout for a praying for you card the first time, I now think of this layout as perfect for this type of sentiment. Hello ... this layout could just as well be for a birthday instead! Truthfully, it is just an awesome layout. Simple to recreate. There is just enough layers and shapes to add interest, but not too much that it is "busy". This has to go into my "love it layouts" folder for any type of card! What do you think ... do you like it?


Recipe:
Paper - My Minds Eye Stella & Rose Mabel 6 x 6 pad, Cardstock Natural White, Ochre, Aqua
Stamps - Flowers by Verve, Sentiment by Impression Obsession
Ink - Versafine Black
Tools - Classic Scalloped Circle, Classic Circle Nestibilities

Other -Ribbon by May Arts, Pearls by Queen & Co.

See you tomorrow. And thanks for being patient with me this week.


Happy Stamping!
Tina

Sunday, June 19, 2011

You're Our Top Dog!

Hello!  Happy Father's Day to all!  Just like Mother's Day, I think Father's Day is a celebration for all, as it celebrates all men. My father died in 1996 but he is still missed and I think about him often.  Today, my card is made for my hubby.  You see, at Mother's Day, he gave me a card and signed it from him and "the girls", so I am doing the same!  "The girls" are Red, the Pomeranian, and CoCo, the Chihuahua!  I decided the new Inky Antics Honey Pop set called Baking Pup would be perfect for my card!  I mean after all, Gary is our top dog!  Too funny!  Let me show you my card and then I have some details, including a Tina tip for you!  Enjoy!


The inside sentiment is No Bones about it!  How fun is that, plus a Pop-up bone!  Do you see the two paws I added on the right side?  That is where I will sign for "the girls"!  I have a couple of comments about the front panel.  First, the sentiment actually was "You're my top dog", but I needed it to say "our" instead of "my", so I used a black marker to only color "you're" and then I used another sentiment from the same set that read " hope your birthday is pawsitively great" and colored the "our" in "your".  That way the fonts match and no one would be the wiser!  Also, a little about the dog on the front of my card ... usually, a chef's hat is white, but my hubby loves green.  He often cooks for me but he dosen't where a chef's hat, but if he did, I am sure, it would be green!  I also had to do some paper pieced layers for the dog.  You can see all the pieces in the pic below.
Which leads me to my Tina Tip ...
When doing any paper piecing, stamp your image out onto your paper, cut them out and color them.  And then, to adhere them, use this ...


By using one of these, you will have adhesive all over, even the smallest of pieces, with no effort!  I have shared this tip in my classes but I am not sure I have ever shared it here.  Try it! 
Recipe:

Paper - Bones by The Paper Company Paws & Claws line called Dog Bones, Green pattern for hat, glove and apron is from Die Cuts with a View Flower Shower Matstack, Lime/Blue pattern is October Afternoon Campfire line called Skipping Rocks, Cardstock White, Lime Green, Blue
Stamps - Inky Antics Baking Pup Honeypop set
Ink - Versafine Black, Prismacolor Pencils, Gamsol, Black Tombow marker
Tools - Honeycomb Pad Ivory, Classic Circle Nestibilities, Cuttlebug Seeing Spots embossing folder
Other - Ribbon by May Arts

In honor of my father, W.C., I want to leave you with a few pics of him.  Interesting fact:  My father's name was W.C. but it did not stand for anything nor did he have a middle name.  When he was in the service during WWII he often had to sign W only C only ... giving him the nickname Wonly Conly!  

Late '80's

My Dad & I 1960

1945 During WWII


As a boy -age?


That is it for me today. Tomorrow and the next day I will be working on my class kits for my class this week, but I hope to be back sometime this week with some new creations.
 
Happy Stamping!
Tina

Saturday, June 18, 2011

Saturday's Sketch Share!

Hello!  Welcome to this week's share between my friend, Debbie and I.  I guess we will get right to it!  I will show you my card, then Debbie's and then the sketch we both created our cards from.  Enjoy!

My Card
Debbie's Card


Debbie's card inside
 

The Sketch


 I thought it was interesting that both Debbie and I changed the size of the sketch and made the card an A-2 size card instead.  I know I did it because I was mailing it to her, and I didn't want to have to hunt for a different size envelope!  This week, I liked Debbie's card much more than mine.  I like that hers had a theme, where mine was just papers, a pretty plain sentiment and a flower die.  It probably doesn't show up, but I did add some crystal glitter to the paper to try to add some interest.  What do you think about our cards this week?   

See you tomorrow!
Happy Stamping!
Tina

Friday, June 17, 2011

Card Class Creations for June!

Hello! I did finish my Father's Day card for the hubby but I decided I will wait and show you my card on Sunday.  That way, I can keep this daily posting thing going.  Do you realize that I have had something new for you seven of the last eight days?  With the upcoming weekend posts, that will make it, nine out of ten!  And, that is great since next week, I probably won't do so good, as I am teaching twice in the same week.  No complaints for me, but I know it will take away from my card creating in my "shack"!  I realized this morning I have not shown you my cards for next week's class.  And I need to, because there is still some space left and you might want to sign up!  Let's get to the cards and then I will give you the class details, in case you live in the metroplex, and are interested.  Enjoy!


"Shake" Card Front

"Shake" Card Inside

"Pop" Front
 

"Pop" Card Inside

"Sparkle" Front

"Sparkle" Inside
I bet you can guess the name of the class ... Shake, Pop, and Sparkle!  I love the Inky Antics girl with her salt shakin' beads!  So cute.  And then I went with the Monkey Honey Pop set because I think the inside with the monkey hanging on the tree is so cute.  The last card uses new products that The Crafty Scrapper is selling which is a double sided tape and a new type of glitter.  Not only is it very sparkly, but when you touch it it feel likes velvet, amazing! 

"Shake, Pop, & Sparkle"  Wed. June 22nd 11:00 a.m. or Sat. June 25th 2:00 p.m. $25
In this class, you will create three very unique and creative cards including a shaker card, a card with an inside pop-up and a card that sparkles and feels like velvet.  Please bring adhesive, small pop-dots, a sharp exacto knife and cutting pad, a glue stick, detailed scissors and your preferred coloring medium (Copics, colored pencils, etc.)  All other supplies provided.  

Taught by me at The Crafty Scrapper, Waxahachie, TX.

So, tomorrow, I will have Saturday's Sketch Share for you and then Sunday, I will show you the Honey Pop card I made for the hubby from "the girls" & I.  By the way, "the girls" include Red, the Pomeranian, and CoCo, the Chihuahua! 

Happy Stamping!
Tina

Thursday, June 16, 2011

Hello Summer!

Hello!  I am back today with a very bright card ... perfect for summer!  I am using a new stamp set and a new 6 x 6 pad, both of which I purchased at the recent scrapbook convention.  So fun when you have new stuff to play with!  Let's get right to my card ...   Enjoy!


This is the second stamp I own with a girl on a swing ... but they are totally different!  After all, does a stamper just own one flower stamp?  Of course not, and that is my point!  I just love any kind of summer image.  Could it be because I live in Texas ... and we have so much summer?  The layout itself was an idea I got from Jen delMuro, but when I went back to find the actual link on her blog, I didn't find it.  But, she did her panels with papers that didn't exactly match perfectly, kinda like what I used.  They go together but do not exactly match.  I think by making them separate panels, it works!  The ribbon and button circle accents make the whole card come together!  Love it!  How about you?

Recipe:

Paper - Jillibean Soup Watermelon Gazpacho Soup 6 x 6 pad, Cardstock White, Blue
Stamps - Darcie's (cling mount set has no name, just a number JCS143)
Ink - Versafine Black, Prismacolor Pencils, Gamsol
Tools - Classic Circles Nestibilities
Other - Ribbon by $1 Target find, Buttons by Doodlebug Designs, Linen Thread by TCP, Rhinestones by Queen & Co.

See you tomorrow!
Happy Stamping!
Tina

Wednesday, June 15, 2011

What A Blast!

Hello!  The first teacher that I had at my store, used to say "there are no rules" in stamping ... and that must be true because today's card has a pink bear on it!  Yes, a pink bear ... but I really wanted to play along in The Cat's Pajamas color challenge for this week with pink, red and teal.  It was a fun card to create even though it is pretty darn silly, especially since I just went out to my room to try to find a small width ribbon so I could add a bow ... a pink bear needs a bow for her hair!  Don't you think?  I also am playing along in Jen's monthly sketch challenge.  So, here is my very silly card and then the two challenges that goes with it!  Enjoy! 


I wish I would have had red ribbon in that very small width to add the bow with, but all I had was the bright pink.  I guess it was more important to be stylish than to match the challenge colors!  LOL!  So, what are your thoughts about this crazy card?  Do you like it?

Recipe:

Paper - Red Dots by Jillibean Soup from Blossom Soup 6 x 6 pad, Pink/Red Dots & Clouds by Echo Park from Walk in the Park line, Aqua by Echo Park from Life is Good line, Cardstock Red, Pink
Stamps - The Cat's Pajamas
Ink - Versafine Black, Prismacolor Pencils, Gamsol
Tools - Classic Circle Nestibilities, The Cat's Pajamas Button Cut-up die, Cuttlebug Polka Dots embossing folder, Cloud is die from Papertrey Inc.
Other - Rhinestones by K & Co., Button, Ribbon by Creative Impressions, Linen Thread by The Cat's Pajamas

See you tomorrow! 
Happy Stamping!
Tina  

Tuesday, June 14, 2011

Have a Great Day ...!

Hello!  I am back today to share my card I made for my stepgranddaugter who is turning 12.  I obviously have the Inky Antics honey pop cards on my brain, because not only did I do one for her, but it is one of the cards I am teaching in my class next week, and I want to do one of them for my hubby later this week.  It is just that they are so easy to make and I feel like the recipient gets to smile twice, once when they see the outside and again when they see the pop on the inside!  For today's card, I used the birdy/cupcake one that I have used before, but this time I roughly cased a card that I love here.  Ever since I saw Broni's card, I new I wanted to "case" it because I love how she had the birdy and the cupcake stamp on the front of her card.  Let me show you mine ... enjoy!

The Front

The Inside

Close-Up of the Honeycomb pop
It's pretty cute, huh?  The only problem I had was with the cherry honeycomb.  I had to redo it because the first one just wasn't opening right.  I think it was because it is such a small little piece to get the glue stick on both sides.  You see in the above pic that yellow circle by the cupcake, it got placed there because when I pulled off the first messed up cherry, I had glue residue on the card that I couldn't get off ... so ... my fix is to put something over it!  When I added the third circle on the bottom right side, I figured no one would ever know, well, except you!  How do you like my card?

Recipe:

Paper - Brown print by KI Memories Sweet Life line called Hard Candy, Solid Yellow is reverse side of American Crafts Bookshelf line, Dots are by Jillibean Soup, Cardstock White
Stamps - Inky Antics Cupcake Birdy
Ink - Versafine Black, Prismacolor Pencils, Gamsol
Tools - Classic Circle, Classic Scalloped Circle Nestibilities, Inky Antics Honeycomb pads - Pink, Brown, Red
Other - Grosgrain ribbon, Pearls by Queen & Co.

See you tomorrow! 
Happy Stamping!
Tina

Monday, June 13, 2011

50th Anniversary!

Hello!  Yesterday, I drove up to Dallas to go to an anniversary party for my friend, Suzy, and her husband, Don.  Suzy taught classes for me when I still had my store.  There were a few rep shows that we attended together, out of town, that we shared a room together.  I always remember how she would always find in her suitcase a love note from her hubby along with some candy or something she liked.  I think that kind of love, for so many years, is rare.  And, I am very happy for them!  So, of course, I made them a card, as the invite said no gifts.  I looked at the scrapbook store for some paper that would work, but found nothing.  Most wedding papers are in silver.  So, I thought, I have gold embossing powder, of course!  And, I can do this, without any scrapbook papers ... after all, that "used" to be the way I made ALL of my cards.  I do love how it came out ... here it is ... enjoy!


I think I need to just QUIT saying I don't like slanted panels.  Because, I had the panel straight, and it was o.k., but when I turned it, I thought "wow", that is perfect!  I kinda followed this sketch from one of the Saturday's sketches.  You can see it on the post here.  I finally used a couple of the decorative circle and oval images from Just Rite.  I bought several sets at the scrapbook convention a year ago, and have hardly inked them up, which is crazy, because they are pretty cool!  When I was looking for some numbers I could use, I came across these glittery silver ones.  My first thought was that maybe I could go over them with either embossing powder or glitter to get them to be gold instead of silver.  But, I decided I liked them silver and left them as they were.  I thought about some ribbon I sold at the store that was gold on one side, and silver on the other.  So, I went digging in the garage in the ex-store's boxes ... yea, I found it.  It tied the gold and silver together ... so perfect!  What do you think about my card?

Recipe:

Paper - Cardstock White, Gold Tone on Tone Stripe (from stash), Glitter Numbers (also from stash, unknown company)
Stamps - Swirl by JudiKins, Congratulations by Hero Arts, Circle and Oval Accents by Just Rite
Ink - Versamark, JudiKins Detail Embossing Powder, heat gun
Tools - Classic Circle Nestibilities, Cuttlebug embossing folder called Victoria
Other - Tiny Swarovski Crystals as accents on Swirl, Rhinestones by Hero Arts, Ribbon by May Arts

Last night, my hubby reminded me that tomorrow is Jordan, the granddaughter's birthday, so I am off to get her card done and in the mail.  So, I should be back tomorrow to show you that one!

Happy Stamping!
Tina

Saturday, June 11, 2011

Saturday's Sketch Share!


Hello!  I am back today with another share between my friend Debbie and I.  Today's sketch, at first glance, seemed kinda odd to me.  It has this vertical panel that seems out of place.  But, I have to say after I finished my card, I decided any sketch can be made great with some pretty papers and stamps!  I love Debbie's take on it too!  She used that Tim Holtz birdcage die that is so cool!  O.k. enough of the talk, let's get to it!  I will show you my card, and then Debbie's and then the sketch.  Enjoy!

My Card


Debbie's Card

The Sketch

Another week is gone!  Have a great weekend!
Happy Stamping!
Tina

Friday, June 10, 2011

Ready ...Set ... Blow! (And a Tutorial!)

Hello!  So, much for me being back on Wednesday or Thursday!  I always have good intentions but it seems that life gets in the way sometimes!  On Tuesday, after I finished the class cards and sent the email to the store owner, I did get back out to my room and got the Saturday sketch card completed so I could get that one in the mail and I started a card, just the base, thinking I would finish it up on Wednesday.  Well, Wednesday rolls around and I decide that I should go see my mom at the nursing home and I could go to my room afterwards.  Well, I think the visit just sucked the creativity right out of me.  I did wake my mom up from a nap, so that's part of the confusion, but even so, she did not know me.  In fact, she argued with me when I told her I was her daughter, Tina.  She wanted to know where Agnes was?  Agnes?  Who's that?  Oh, I find out she's my sister!  Yea, right!  Anyway, sorry to vent here, but I do appreciate it.  Now it is Thursday, and the idea for the card base I no longer like, but I know I need to add something to the size ovals that I have already die cutted out.  I decide to go with an old favorite!  As I was starting to cut out my bunny, I thought about that I have never given you the instructions on what is called the "outside the box technique".  I taught it in my last class but I have not shared it here on the blog so that is what you are getting from me today!  First, here is my finished card.  Enjoy!


Old favorite, or not ... I love this card.  Actually, it is more like old meets new, because the daisy dies are pretty new and the paper pad is very new!  One more thing, I have always made the squares Flopsey is holding to look like presents so I could paper piece them.  I decided I wanted to go with the cake instead and still paper piece them.  Adding the candles makes it look like a cake, paper piecing and all!  Cool!  O.k., let me give you the recipe and then I will get to the tutorial. 

Recipe:

Paper - My Minds Eye Lime Twist Happy Go Lucky 6 x6 Pad, Cardstock Pink, White, Olive Green
Stamps - Birthday Flopsey by My Favorite Things
Ink - Versafine Black, Prismacolor Pencils, Gamsol, Buttercup Stickles for the flames
Tools - Classic Oval, Classic Scalloped Oval Nestibilities, My Favorite Things Die-namics Upsy Daisy set
Other - Pearls by Kaisercraft
Here is another look at the class card I am talking about where I taught this tutorial.  Do you see on the right hand side how the flowers look like they are coming out of the die.  The technique was perfect for this stamp because it would have been difficult to cut around all of the intricate daisies.  By doing the "out of the box" technique, I only had to do the intricate cuts on one of the daisies!  But, for ease of showing you how to do it, I will show you with the bunny from today's card.


Step 1: Stamp and place the nestibilities die on top. 
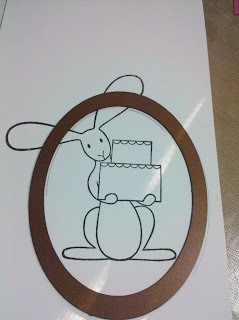
Step 2:  With a pencil, trace around outside of the die, especially in the area that is going to be "outside" (in this case, the ears) You will also need to lightly mark a line on the inside of the die, above and below the portion that will be "outside" (again in this case, above and below the ears).  I think you can see my pencil marks in the pic below.


Step 3:  Remove the die.  With a sharp pair of scissors, cut from the edge of your paper a little farther in than the inner line you drew above and below "the ears".  And then cut, around the ears ONLY up to the outside lines.


Step: 4:  Place the die into position, with the cutting edge down, using your outside pencil marks as a guide.  When you slide the die into place, lift the section that will be outside so that it lays above the die.  This will keep it from being cut off when you run it thru your die machine.  See the pic below.


Step 5:  After you run it thru your machine, remove the die, erase your pencil marks and do any additional trimming.  The pic below is before the pencils marks are erased but you can see that the ears are still in tact but look like they are "outside of the box".


That's it!  It is really not so hard once you get the hang of it!  I would suggest you try it first on something similar to the bunny so you don't have to worry about too much cutting the first time.  I hope this tutorial was helpful and please email me if you have any questions.

I will be back tomorrow with Saturday's sketch challenge, see you then!

Happy Stamping!
Tina
 

Tuesday, June 7, 2011

Texas State of Mind!

Hello!  I have a Texas Tues-Step creation for you today using a couple of the new stamps that Mark from Deadbeat Designs sent me.  When I saw his Texas hot air balloon stamp, I immediately thought it needed to be flying in the sky over us, which lead me to create this Texas "scene"!  Let me get to showing you my card, and then I can chit chat about it more.  Here is my card with a couple of views ... Enjoy!

Whole Card showing Easel

Close-Up of the Front

You know how sometimes you look up at the clouds and you can see certain shapes?  Well, can you see in my clouds ... a shape of Texas?  Look closely!  I really wanted to use the "Texas State of Mind" stamp but it was much too large to add to my scene, so I made the whole card an easel card ...perfect!  Thank goodness for great embellishments like twine and buttons to make this card complete.  I love how it came out, how about you?

Recipe:

Paper - Cardstock White, Red, Blue (Look NO Scrapbook Paper!!)
Stamps - Balloon and Sentiment from Deadbeat Designs, Grass from Stampscapes, Tiny Bluebonnet from Rubber Stamp Tapestry (I don't think this is really a bluebonnet from them, but it looks like one to me!)
Ink - Marvy Matchables -Saliva Blue for clouds and flowers, Pine Green & Yellow Green for grass, Versafine Black for outline of balloon, Prismacolor Pencils and Gamsol to color balloon, Versafine Satin Red for sentiment
Tools - Punched out Texas shape from Punch Bunch, Die Cut Clouds from Papertrey Inc. to create sky, Stipple Brush, Labels 8 Nestibilities, Stampin' Up Square Lattice embossing folder
Other - Button by Bo Bunny, Twine by The Twinery, Metal Dots

I think there are still a couple of Texas "guys" who do creations on Texas Tues-Step Days.  You can see my list on the right side of my blog.  But, I would think the best bets would be Mark, and Danielle.  At least I hope so!

I have been working on my class cards for the class I will be teaching later this month for three days now.  I think I am almost done.  I hope so, because I want to get to some new cards for you.  So, hopefully, I will be back tomorrow with something new! 

Happy Stamping!
Tina

Saturday, June 4, 2011

Saturday's Sketch Share!

Hello!  I am back today with another sketch share.  I will show you my take on the sketch, my friend Debbie's take and then the sketch.  Enjoy!


My Card

Debbie's Card
  

The Sketch

This was not a favorite for me.  I thought my card came out way too busy.  I couldn't come up with any way to make it better, so I left it.  But, even looking at it here, I still don't much like it.  Debbie's card was quite comical!  If I asked for a fairy godmother, I can see this guy showing up instead!  Makes one think twice about asking, don't ya think? 

The scrapbook convention on Thursday was a lot of fun.  It was great seeing so many people that I haven't seen in a while.  And, it was a lot of fun spending money on some new goodies.  Thank goodness for my new teaching gig as it gave me more money to spend!  Woo Hoo!  And speaking of teaching, I am in the middle of creating my next set of cards for my June classes.  The dates are Wed., June 22nd, and Sat., June 25th.  Same class but different days.  If I get them done, and can work on something new for you, you will see me on Monday.  If not, I will be back  on Tuesday with the Texas Tues-Step post.  Enjoy the rest of your weekend! 

Happy Stamping!
Tina

 
design by suckmylolly.com